Welcome to the first installment of my Design Series. In this series of blog posts, I will provide the steps necessary to recreate different effects in Adobe Photoshop and Illustrator. You will then be equipped with the knowledge so that you can apply these effects in your designs. In this tutorial, I will cover the Particle Dispersion. This effect spreads one part of your subject out into many particles. We will be blasting out the back half of our subject to make it seem like he is whisking away while jumping downward.
This effect is easy to create and you can let your creativity flow. All you would need is a subject and a good splatter brush that you like to use. The type of brush is up to you. Let’s view the example I have used to illustrate this point.
Step 1: Set your Stage
First, find your subject and the brush want to use. I have downloaded my brush from online, it’s more of a blood splatter brush but it will still help to illustrate this. You can search online for Photoshop brushes by simply searching using those keywords. If you are looking for a specific brush put in for example Photoshop Brushes “Splatter” and find the brush you want. You can also create your own brush from the from the brush options panel.
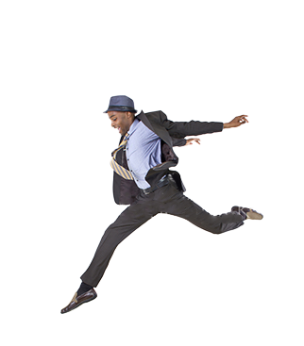
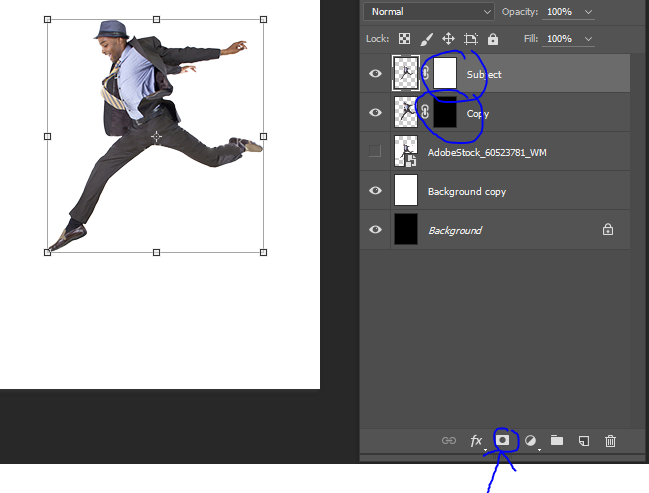
As for my subject, I downloaded the photo from Adobe Stock. As you see it is a picture of a man leaping forward which is good because he is in motion. I have already cut him out from the original photo which can be done by using the Quick Select tool (Press W) and using the Select and Mask option (formerly Refine Edge) to cut out to your liking.
Step 2: Make a copy
Next, you need to make a copy of the subject by pressing CTRL/CMD+J. We now need to stretch the Copy out and this where a good bit of the dispersion will take place. So visualize how far you need to stretch the copy to create this effect. Transform by Pressing CTRL/CMD+T and stretch the subject to your liking.
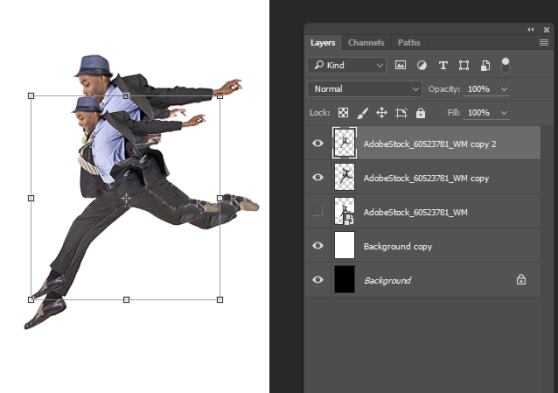
Step 3: Add your layer masks
Now for both layers, the Subject and Copy add a layer mask. Go to the layers tab with the layer selected go to layer mask(The box with the hole inside) and select. Do this for both layers. You will see a layer mask with a white box. Now mask the Copy layer, do this by selecting the layer mask and pressing CTRL+I for Inverse which will turn the box black and your copy will disappear.
Step 4: Dispersion effect
With this done now you need to select the Brush tool, Press B and have your brush selected in the top Brush menu. With the layer mask selected you will see you only have Black and White colors. Always remember with layer masks Black to Hide, White to Reveal. You can start with either the Subject or Copy. For the Copy, you will want to paint White within where you stretched it. For the Subject paint Black on the back side of the picture to add to the dispersion effect.
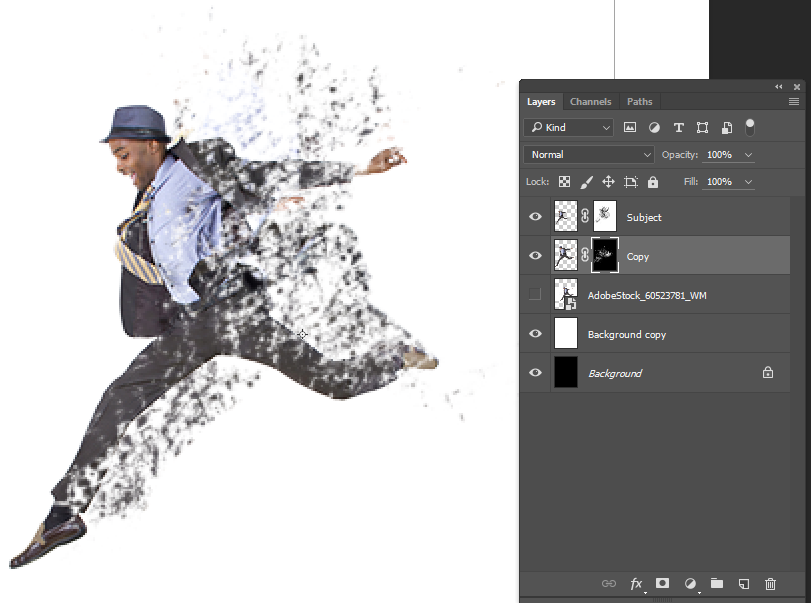
At this point, it is up to you how you want the particle dispersion to pan out. I used the same steps as above and it took no time at all. The trick to this effect is the brush you decide to use that can make your design stand out. Be creative!
Enjoy.